Pages

Thursday, December 12, 2013

Apple Tartlets Almost-Biscuits

These little puppies were a partial inspiration from Health-Bent's Peach Frangipane recipe.

I love apples. I love apple pie. I love almost all things apples. So when we knew we were heading to my boyfriend's parent's house for Thanksgiving, I knew I wanted to make some sort of apple treat. Thanksgiving is not the same in my mind without some apple-y dessert!

I made a version of Health-Bent's tart with a blueberry topping and I really liked it! But I wanted to cut out the sugar and figure out a way to use the same basic ingredients they used (almonds, eggs, coconut oil) to make a quick and easy apple tart. Thus, this recipe was born. It's got a pretty dense almond layer, and without the added sugar it has a more savory, biscuit-like taste (hence the "Almost-Biscuits" in the title!).

You can certainly add sweetener to the base if you want something sweeter. I'd recommend a few tablespoons of honey.

These tarts did not last very long! They were a perfect treat to eat alongside a hot cup of tea or coffee.

Ingredients
1) 1 1/2 cups of almonds (I used roasted and salted)
2) 3 eggs
3) 4 tablespoons coconut oil (1/4 cup), melted
4) 2 apples, finely diced
Optional:
5) 2 tablespoons of honey or maple syrup to add sweetness. But I made mine without and even the non-Paleo guys liked it.

Instructions
**Preheat oven to 350 degrees.
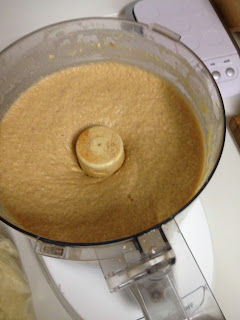
1) Add the almonds, eggs, and melted coconut oil to a food processor.

                                                    
2) Blend until it makes a paste. This is your base of the tartlet.
3) Chop up your apples into small pieces so they cook easier and stick easier.
4) Into silicone muffin tins, or paper muffin cups, or well greased muffin tin, add in a scoop of your tartlet base. This made 12 muffins perfectly for me, so spread the batter out evenly between the muffins. Press the batter down so it's level.
5) Add a mound of chopped up apples to each muffin, evenly dividing the two chopped apples.
6) I sprinkled my muffins with cinnamon for some extra flavor and some visual appeal. 
7) Bake at 350 for 18-25 minutes, until your tart is thoroughly cooked and firm when you press it.
8) Let cool and remove from your muffin tins. Enjoy!


Saturday, December 7, 2013

Chicken Pot Stew (Paleo, Zone)

So this is kind of like chicken pot pie, except there is no crust on the top and I instead mixed what would have been the crust into the filling to make it creamy and rich. So it tastes like chicken pot pie, Paleo-style, but it is stew! And I pretty much call everything stew!

Man, it is freezing in Texas this week! It is 30 degrees right now and I would happily heat some of this tasty stew up and warm my insides!

Working out in this weather has been interesting...My second CrossFit competition is coming up in TWO WEEKS! Yikes, where did the time go? My only hope is that it's not 30 degrees, and that my boyfriend brings me some of this chicken pot stew for a happy post-WOD celebration!

This meal is also Zoned, but if you are not following the 40-30-30 guidelines, you don't need to be as specific with your measurements, and you certainly don't need to use as many vegetables if you don't want. But I like the bulk that it adds without the added guilt!

Ingredients
1) 1 1/2 pound of cooked shredded or diced chicken (24 ounces = 24 zone blocks protein)
2) 3 pounds of carrots, thinly sliced (10-11 zone blocks carbs)  --- you can add less if you don't want it as carrot-y, but I like all the bulk it gave to the meal
3) 3 large onions, diced (8 cups raw = 13 blocks carbs)
4) 2 cups of chicken stock (or water, but it won't give as much flavor)
5) 3/4 cup of almond flour (24 blocks fat)
Optional: Salt & Pepper to taste

I made chicken stock in the crockpot the day before, via this recipe of mine, and then used the cooked chicken AND the stock from that recipe. Easy peasy!

Instructions
1) Get out the biggest pan you have, because this is a lot of veggies!
2) Chop up your carrots and onions, and add them to your large pan over medium-high heat.
3) Let your veggies cook and soften, stirring about every 5 minutes, until they are very tender. Mine took about 30 minutes. Your veggies will slightly cook in the oven, so make sure you get them 90% of the way there in the saute pan.

***Preheat your oven to 350 degrees now***
4) Once the veggies are cooked, stir in your two cups of chicken broth and your 3/4 cup of almond flour. Mix completely.
5) Add in your cooked chicken, and stir to incorporate.
6) Pour into a large cooking dish, and put in the oven for 60 minutes on 350 degrees.
7) Enjoy! It's hot, so be careful!


Sunday, December 1, 2013

Simple Banana Bread Muffins (No Added Sugar)

We went to my boyfriend's parent's house for Thanksgiving break, and when we came home I had a bunch of overly ripe bananas that we hadn't eaten before we left. In this house, we absolutely love banana bread and I've tried a few different grain-free versions (most of which were awesome!), but I had never tried to make my own 5-ingredient version. I wasn't really sure how this would work out or taste, but it came out delicious!

Ingredients
1) 2 cups almond flour (I recommend Honeyville)
2) 3 eggs
3) 2 very ripe bananas (if your bananas are not super ripe, you can still use them and add in some honey to sweeten the batter)
4) 1/4 cup coconut oil, melted
5) 2 teaspoons baking powder

Optional Add-ins:
1 TBSP cinnamon
1/2 cup chopped nuts (I added almonds and it gave it a nice crunch!)
1/2 cup dried fruit or fresh blueberries
1/2 cup chocolate chips

Instructions
                                    

1) Preheat oven to 350 degrees.
2) This works best in the food processor but you can use a hand mixer too. Add the eggs, melted coconut oil and bananas to your bowl.
3) Blend until the bananas are completely mixed.
4) Add your almond flour and baking powder, and mix until fully incorporated.
5) Add your additional add-ins here if you are using any. I added cinnamon and chopped almonds, but made half of them plain and they were still super delicious!
6) Cook at 350 for 18-25 minutes, until fully cooked and firm when you press on them. I cooked them in silicone muffin liners, or you can use muffin liners in a regular muffin pan, or you can grease your muffin tin so the batter doesn't stick.
7) Enjoy! These would be delicious with some added butter or honey on top, as well.