Pages

Monday, July 29, 2013

Cabbage Not-Rolled Casserole

This is kind of like my boyfriend's mother's version of Polish cabbage rolls, except I think a million times easier. But it doesn't have any of the rice/buckwheat filling. It still tastes amazing though, and we eat it at least once a month when we pick up cabbage at the store.

It may seem a little time consuming, because you have to cook the cabbage first, which is why I usually make this on the weekend. Plus it needs to cook for an hour.

BUT TRUST ME-------It's worth it!

Cabbage is super cheap, and adds a lot of extra bulk to this meal. This is 2 pounds of meat, so it makes about six portions (5oz of meat each). It really doesn't seem to fit very well into a 9x13 pan, so I always have to use two pans. But, again, totally worth it!

Ingredients
1) 2 pounds of ground meat (I used beef, but any mix or any type would work)
2) 2 normal-sized cabbages (I used green, you could use green and red if you want)
3) 2 cans (14oz each) of tomato sauce---or you can make your own!
4) 1 TBSP each of: Onion Powder, Garlic Powder, Paprika

Instructions
1) First get a big pot of water on the stove to boil.
2) Chop up your cabbages into strips, like noodles.
Cut up your cabbage into strips
3) Once the water is boiling, add some salt to the pot, and then add in your cabbage. If your pot is big enough, you should be able to fit it all in. If not, do it in two batches.
So much cabbage!
4) Let the cabbage boil for 10 minutes, until soft. Then drain.
Time to drain the cooked cabbage
5) While the cabbage is boiling, get your ground beef browning in a separate pan.
6) Once browned, add in your tablespoons of onion powder, garlic powder, and paprika. Stir to incorporate.
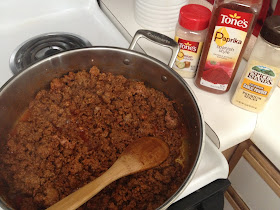
Yummy meat filling
7) Now you're ready to assemble your casserole! You'll need two 9x13 pans, or a 9x13 and an 8x8 pan. I used a 9x13 and an 8x8 so the rest of the recipe follows that guideline. (Assume the 9x13 will get 2/3 of your layers, and the 8x8 gets 1/3 to make this easy).
8) Layer cabbage onto the bottom of your pans. You should use 1/2 of the total cabbage, split accordingly between your two pans.
9) Next layer is your meat---using 1/2 of your total meat, layer it on top of your cabbage. I used a measuring cup to do this. It won't cover every piece of cabbage, just make it evenly distributed.
Cabbage layer + Meat Layer
10) Use one can of tomato sauce to spread over both pans. Again, it won't cover everything, just spread it around.
Cabbage layer + Meat layer + Tomato Sauce layer
11) Repeat all three layers again until your ingredients are gone.
Layered up!
Oven Time
12) Cook at 350 degrees for 1 hour, until the top is browning and everything is bubbly.
13) Let cool for at least 10 minutes so you don't burn your mouth! ENJOY!


Eat me!
Portioned out for lunches. Coworkers be jealous!

Wednesday, July 24, 2013

Salty Bacon Pulled Pork

I had you at "Bacon", didn't I?

Ok, get ready, because this is the easiest and tastiest pulled pork in the entire world! Yes, the entire world.

I made this once before but made the mistake of leaving in all of the salty liquid that comes out of the pork when it's done cooking, and the boyfriend said it was too salty. Super sad face! So I made it again, and figured out how to make it the right amount of salty to everyone's individual preference. Winning!

This is seriously easy, and an awesome use of pork roast when I never know what to do with. Warning: you will want to eat it straight out of the crockpot!

Serve it up with some delicious sides, like my easy roasted carrots! It's also an awesome thing to have on hand if you're doing the Zone because you can just measure out however many ounces of meat you need for your meal/snack and you're golden.

You're welcome. Eat up!

Ingredients
1) 3 pound pork roast (I bought a 6 pound one at Sam's Club and cut it in half. Now I can make this twice!)
2) 3-4 slices of bacon (or more if you want more, or less if you want less)
3) 1.5 TBSP of salt (this is for 3 pounds, if you use less pounds, use less salt or you will not like it!)

Instructions
NOTE: You want to use a crockpot that has a timer, or you need to set a timer somewhere else so you know how long it's cooking!
1) Put your bacon slices on the bottom of a crock pot. No need to dice: they will shred into the meat.
2) Put your pork roast on top of the bacon.
3) Sprinkle your salt on top of the roast.
Ready to cook in the crockpot
4) Cook in the crockpot for 16 hours. No, seriously. SIXTEEN HOURS. Don't skimp on this! I started it after dinner and it was ready for lunch the next day.
16 hours in the crockpot
5) After the roast has cooked, use a measuring cup or a turkey baster to get out as much of the liquid as you can from the pot.
After cooking!
Juice drained, and ready to shred and add some liquid back in
6) Now use two forks and shred your pork. It should be super easy to do this!
Shredded and a few cups of liquid added back
7) Starting 1 cup at a time, add back in some liquid to your shredded pork. Stir to incorporate, and try your pork. Not salty enough yet? Add in another cup, mix, and taste again. I added back in about half (3ish cups) of the liquid until it was perfectly salty for my boyfriend's tastes. This added liquid also helps keep the pork more moist.
8) Now eat up! You can discard the extra salty liquid, or use it to cook some cabbage or carrots or whatever you want in it. But it's pretty salty---you've been warned!


Sooooooo good!

Monday, July 22, 2013

Oven Fried Breaded Eggplant

This is kind of like the inside of eggplant Parmesan, I think. But without the cheese, and without the tomato sauce. So maybe not...

My boyfriend said these tasted like soft Sour Cream & Onion potato chips. What a weird description.

But they really are delicious. We made two trays and ate them ALL with our dinner, which technically I guess was only really 3 whole eggplants. Yay, vegetables!

It's hard to explain these, but if you have some eggplant hanging around or want to buy some because it's finally eggplant season at the store, YOU SHOULD MAKE THESE! They're an awesome veggie side dish, or an equally awesome party appetizer.

Ingredients
1) 3-4 medium-sized eggplants
2) 1 cup of Almond Flour (I use Honeyville)
3) 1 TBSP onion powder, 1 TBSP garlic powder, 1 teaspoon salt & pepper

Instructions
1) First things first, you want to cut and peel your eggplants. I would suggest peeling it first, and then slicing it into discs, about 1/2 inch thick. You can keep the skin on if you like it, but it's pretty chewy for my taste.
2) Put all of the eggplant discs into a collander, sprinkle with about 1 teaspoon of salt, and let sit for 30 minutes. This draws out some of the moisture and makes it less bitter.
Eggplant discs
Salted, and waiting to be breaded
3) Now preheat your oven to 400 degrees.
4) Time to make the breading for these eggplant discs! Combine your almond flour, onion powder, garlic powder, salt and pepper onto a plate with a lip, or a pie pan.
5) Rinse off your eggplants now, and while they are still wet, place a few of them onto the breading. Gently press down, and flip over to coat both sides. It will stick extra in places, so use your fingers to even it all out.
6) Once breaded, place onto a cookie sheet with parchment paper or a silicone mat on it.
Breading my eggplants
7) Continue this process until all of your eggplant is breaded and on the pan. This made two cookie sheets worth.
8) Cook at 400 degrees for 15 minutes, and then flip your discs over and cook another 15 minutes, making sure they don't burn. Continue to cook another 5-15 minutes until it's browned on both sides and looks done.
9) Remove from the oven, and serve. Try not to eat a whole pan at once. I bet you can't!


Time to cook!

Done!

What a lovely, delicious side dish. YUMMMM!

Tuesday, July 16, 2013

Easiest Taco Salad

This has seriously become something we eat at least once a week because it is just so easy and you can always add more stuff to it. Like cheese or sour cream (if you do dairy), or more veggies, or olives, etc! Yum, I want to add olives to mine now.

Ingredients
1) 1-2 pounds of ground meat (I use beef because that's what is always in my freezer)
2) 1-3 cups of salsa (any kind, any heat level, it's up to you! We just use plain old Pace Medium)
3) Few cups of shredded lettuce, or baby spinach for your base (we just buy some organic triple spring blend of lettuces from the store and throw that on the plate)
4) Your toppings: I used cut up baby tomatoes, and a nice dollap of guacamole. This is where you can go nuts! Add your veggies, sauces, olives, whatever you would normally like on a taco

Instructions
1) Brown up your ground meat on medium in a big pan.
2) Once cooked, add in your salsa, about a cup at a time until it's the right amount of liquid that you like. I usually add a lot of salsa because I like mine moist and extra saucy.
3) Put the lettuce you've chosen onto your plate. Top it off with your ground meat, and then add your toppings.
4) Eat up! Look at all those yummy, healthy veggies on your plate. Who needs a tortilla?!


Gorgeous :)

Tuesday, July 9, 2013

Breakfast Omelette Egg Muffins

If you're anything like we are, you understand how important it is to get as much sleep as you possibly can. Because of this, we don't get up early and make breakfast everyday, so we can sleep just a little longer. Personally, I love me some 9hrs of sleep, but the boyfriend prefers about 8hrs. Either way, we don't want to miss out and have to get up early to make some eggs for breakfast.

Enter the best morning time saver ever.

Omelette muffins. Yup, you heard me! These are very simple, and you can make them to fit your own personal tastes! You can even make half the batch one flavor and half another, so you don't get bored. I always make a double batch and freeze half of it, so I only have to cook this about every 3 weeks.

You could make this in a regular pan, but I find that putting it in the muffin tins makes it easier to portion it all out, and the silicon muffin tins are the easiest in the world. But again, you could make it in a pie pan or a 9x13 pan, or whatever your heart desires. But make them; you won't be sorry!

Ingredients (this makes me 20 muffins, but could make 24 if you fill them up a little less, or 18 if you like them SUPER full)
1) 12 raw eggs
2) 1 pound of ground meat (we really like ground sausage in ours, but ground pork and ground beef are great. Cut up sausage links, or use ground turkey, or omit the meat if you prefer.)
3) 1 onion (if you like onions)
4) Extras for your omelette: I added in a LOT of sundried tomatoes and cut up artichoke hearts to my half of the batch, but the boyfriend prefers it just plain with sausage and onions. I would have totally added in some green peppers if I had them on hand when I made these. You could add in cheese if you wanted too. Whatever you like in your omelette, THROW IT IN HERE!

Instructions
1) Preheat oven to 350 degrees. Figure out what you'll bake these in. If using silicone, no greasing is required. If using regular muffin tins or a pan, grease it a little to prevent sticking.
2) Toss your ground meat into a large pan on medium heat to begin browning.
3) When some of the fat has been released, add in your onions and any other thicker vegetable that needs more cooking (i.e. carrots, peppers).
Meat and Onions starting to saute
4) Let saute together until the onions/veggies are your desired tenderness. I cook this about 20 minutes because I really hate the taste of raw onions, and the veggies won't really cook up more in the oven so make sure it's how you'd eat it!
5) Remove from the heat source, and let set about 3-5 minutes to slightly cool before you add the raw eggs.
6) Add in any extra items you want at this time. (I added cut up sundried tomatoes and artichoke hearts. Add in your cheese now if you want it!)
7) Add in your 12 raw eggs. If you want to make this an even 24 muffins, you could add in about 14 eggs.
Time to add the eggs
8) Stir it all together, and then divide it into your muffin tins (or pour it in your pan).
Mixture, ready for the muffin tins
Cups filled up and ready to bake!
9) Bake for 22-30 minutes until your muffins are golden on top.
10) Eat these for breakfast! Or dinner! Or whenever. And enjoy the extra sleep in the morning.

All done!

Amazing. And I ate it for dinner. Not just for breakfast, folks!

Friday, July 5, 2013

Chocolate Chili

Did I just put chocolate and chili in the same recipe? Yes, yes I did. Well technically it's cocoa powder in your chili, but that doesn't have quite the same ring to it.

So it's chocolate. Yup. Chocolate Chili. CHOCOLATE CHILI!

Are you pumped up yet?

Chili is seriously one of the easiest dishes to make, and after you let this bad boy simmer for a few hours, it's absolutely AMAZING. We chowed down on this awesomeness, and we were super happy. The boyfriend even ate a second bowl the next day with some sauerkraut in it. I guess that's his thing, so he was happy. I think it's pretty delicious on it's own too.

You could definitely make this a half batch, or make it a double batch with pretty much the same amount of work. This gave us 6 servings, and I am wishing I would have doubled it!

Ingredients
1) 2 pounds of ground meat (I used beef for both, but a combo or beef and pork would be tasty too!)
2) 2 onions (because I like onions in mine. You could use 1. Or 3. Yup.)
3) 2-3 bell peppers (I used three green ones, because they were cheaper at the store. Frugality is a virtue!)
4) 1 28oz can of diced tomatoes (or 2 14oz cans would work. I happened to buy the "diced tomatoes with chilis" and holy CRAP did that make this delicious. But it definitely gave it a kick too. Whatever you have on hand or find at the store. You could even dice up your own tomatoes if you wanted. Probably a good 4 cups of them.)
5) Spices: 2TBSP chili powder, 2TBSP cumin, 4 TBSP cocoa powder

Don't skimp on the spices. They are definitely the money makers here!

Instructions
1) Brown your ground beef on medium heat.
2) While it's browning, chop up your onions and peppers into bite sized pieces. Doesn't have to be fancy or pretty.
3) Once the beef has started to release some of it's fat, throw in the vegetables to start them getting tender. Cook 5-8 minutes until the onions are getting translucent.

Ground beef, onions and peppers
 4) Now it's time to add your spices. Stir to incorporate well, and then add in your tomatoes (don't drain them).
Ready to simmer
5) Stir to mix well, and then simmer on the stove under medium to medium-low heat (whatever keeps it simmering) for at least two hours. Stir it every 30 minutes to make sure nothing is getting stuck to the bottom of the pan.
6) The two hours is very important to help marry all the flavors together. Don't leave it out!
7) Eat up. Right now!

After 2 hours of simmering (YUM!)

Eat me!

Tuesday, July 2, 2013

Juicy Maple-Glazed Pork Chops

I never really used to cook with pork. I was a beef, chicken, seafood girl for most of my life. But ever since I started dating my boyfriend, who is Polish, I have been warming up to pork. They eat this stuff like crazy! So the last time we ordered some meat online, I threw in some pork chops to see what I could do with them.

And they sat in the freezer for months. Whoops.

Until now! This is a slight adaptation of a recipe I found when searching the web for how to cook pork chops. And it was amazingly juicy and tender, and delicious.

I think I may like pork now. Like, A LOT.

Ingredients
1) 2-4 pork chops (mine were center-cut, boneless), about 1 inch thick or whatever you have
2) 2 cups of water, 2 tablespoons of salt (for the brine)
3) 1 tablespoon of cooking fat, your choice (I used duck fat this time, but coconut oil would be great)
4) 1/2 to 1 tablespoon of maple syrup

Instructions
1) Well first you're going to brine these puppies, which I had never done before. But it definitely makes a difference in the juiciness of your meat!
2) Heat up 1 cup of water until very hot. Add in your 2 tablespoons of salt and stir until dissolved. Then add in 1 more cup of cold water. Stir and let sit until it's not too hot anymore.
3) Using a small pan (8x8 works), put in your pork chops, and then cover them with the brine. It should cover the whole thing. This pan size should work for 2 or 4 chops.
4) Place the pan in the fridge for 1-3 hours to marinate. I did it for an hour because it was almost dinner time when I started.


The brine and the chops!
5) After the pork chops have spent some time in the fridge, they're ready to cook!
6) Preheat your oven to 400 degrees.
7) On the stove top, you need to use a pan that you can put into the oven with the chops in it. I used a cast iron, but any pan that's oven safe will work.
8) Heat up your pan on medium-high heat for at least 5 minutes.
9) Drain the brine from the pork chops and use a paper towel to dry them off. Then coat both sides with a little bit of your cooking fat.
10) Once the pan is hot, add the pork chops to the pan and cook for 3 minutes on this side.
11) Flip the chops over, and add about 1 teaspoon of maple syrup to the top of each pork chop, and then pop the whole thing in the oven.
12) Cook another 4-8 minutes, until the chops are at your desired doneness. I cooked them to 140 degrees, and that took 5 minutes.
13) Take the chops out of the pan so they don't cook anymore, and serve them up.

Super juicy and delicious! You could definitely use honey or brown sugar on top in place of the maple syrup if you don't have it. Just gives it a tiny sweetness.

YUM!


Just placed in the pan

Done! And ready for eating :)