Wednesday, January 29, 2014

Pureed Coconut Carrots with Shredded Meat Topping (Paleo-Zone)

We made a big pot of slow cooked ribs this weekend for a game night we hosted, and we had a lot of leftovers the next day. Trying to make a Paleo-Zone meal with the leftover shredded meat, I thought about using up some of the awesome organic carrots we just bought from Costco. You would think that coconut and carrots don't really go together, but the coconut cream eases the pureeing of the carrots and adds a nice subtle sweet flavor to it as well. The combination of some salty meat on top of a mound of mildly sweet carrots was very delicious!

You can definitely serve these carrots as a side dish and not do the shredded meat topping, but this is an easy way to make up a complete meal with some leftovers and minimal ingredients. If you don't care about the Zone part of it, just use roughly the same measurements but you don't need to be as specific.

Ingredients
1) 2 1/2 pounds of carrots, roughly chopped (12 blocks of carbs)
2) 2 1/2 tablespoons of coconut cream concentrate (aka coconut cream or coconut butter) (15 blocks fat plus 1 block of carbs)
3) 1 tablespoon of honey (2 blocks of carbs)
4) 1 teaspoon of cinnamon
5) Optional: 15 ounces of precooked shredded meat---I used shredded pork from ribs, you could use shredded chicken/beef/etc (15 blocks protein)

Zone total: 15 protein/15 carb/15 fat (I weighed it when done into five portions of 3/3/3 each)

Instructions
1) Add your chopped carrots to a large pan and cover the carrots entirely with water.

Carrots & Water
2) Bring the water to a boil and cook the carrots until completely soft, 25-35 minutes. (Mine took 30).
After boiling for 30 minutes
3) Drain your carrots and add half of them to a food processor or large blender. Add your coconut cream, honey and cinnamon.
Ready to blend
4) Blend your mixture and then while the motor is still running, slowly add in the rest of your carrots until the whole thing is pureed. Mine took about 5 minutes to get completely smooth.
Adding in the rest of the carrots
All pureed and smooth
5) Top with shredded meat for a great complete meal, or serve as a side dish.
Delicious meal in no time!

Sunday, January 26, 2014

(No-bake) Not-Nutella Balls

Everytime we go to Costco, I want to buy a giant jar of Nutella and eat the whole thing in one day with a spoon while watching Netflix. It is so delicious, but definitely not my definition of a good, healthy decision.

So instead, I bought some hazelnuts and wanted to try and create some sort of chocolatey-hazelnut treat to satisfy my Nutella desires.

I made this little gems for my birthday and got some pretty great reviews, and my boyfriend happily ate the leftovers for breakfast the next day.

Ingredients
1) 1 1/2 cups of hazelnuts
2) 3/4 cup of chocolate chips (I use Enjoy Life, because they are delicious, dairy/soy free and only three ingredients! Order on Amazon!)
3) 1/4 cup of coconut oil
4) 1 cup of shredded coconut
Optional:
5) 1-2 tablespoons of maple syrup or honey

Instructions
1) Add your hazelnuts to your food processor and pulse until it breaks down into flour.       

                                           
2) Microwave your chocolate chips until melted, and then add them to the food processor. Then add your coconut oil, shredded coconut and optional sweetener.
3) Blend until smooth and everything is incorporated.
4) Roll into balls and let harden at least 30 minutes in the fridge.

Monday, January 20, 2014

Paleo Fig Bars (No added sugar)

They just opened up a new Costco closer to our home, and it was the happiest day ever when shopping there and I discovered they sell organic, dried figs with no other ingredients. I super love dried figs--they are a paleo sweet-tooth gal's best friend, let me tell you! While eating them straight from the bag is easy and delicious, I really wanted to try and create an attempt at a paleo version of a fig newton. While these don't look anything like it, they taste very similar and are really easy and quick!

This makes an 8x8 pan size, but be warned: I made a batch, and we ate the entire thing while playing a heated game of Risk....because we are giant dorks with huge sweet tooths. Enjoy!

Ingredients
1) 1/2 cup of pitted dates (about 10-12)
2) 1/2 cup of almonds or any other nut you like (for the crust) + 1/2 cup for the filling (1 cup total)
3) 1/4 cup of coconut cream concentrate (aka coconut butter or creamed coconut)
4) 1 1/2 cups of dried figs, stems removed
5) 1 tablespoon of cocoa powder

Instructions
1) Add your dates, 1/2 cup of nuts and 1/4 cup of coconut cream to a food processor.


2) Blend until it looks like wet sand, about 1 minute.
3) This is your crust. Press it into an 8x8 pan until compact and even.
4) Now add another 1/2 cup of nuts, 1 1/2 cups of figs and your cocoa powder to the food processor.
5) Blend about 1 minute until it looks like wet sand, too.
6) This is your filling. Press it on top of the crust in your 8x8 pan, until pressed down and even all around.
7) Pop in the fridge for at least 1 hour until the crust hardens, then you'll easily be able to cut out your pieces.

Tuesday, January 14, 2014

Pureed Butternut Squash Soup

Winter is in full effect, which means that winter squash are still plentiful and inexpensive at the grocery store. I sure do love butternut squash, and ever since I found the packages of pre-cut squash at the store, I've been buying it every time I go and making use of it. Instead of making a stew this time though, I wanted to make a soup. Nothing tastes better on a cold night than some warm soup in your belly, in my opinion.

This dish was pretty easy to make, and came out nice and hearty. I added a few ounces of shredded pork on my soup when I ate it, to round the meal out.

Ingredients
1) 2 pounds of diced butternut squash (use the pre-packaged if you can find it, or peel and dice your own)
2) 3-4 large carrots, roughly chopped
3) 1 onion, roughly chopped
4) 2 cups of chicken/beef stock or water
5) 1/2 tablespoon each of: cinnamon and ginger
Optional: 2 tablespoons of ghee, coconut oil, or olive oil to add some fat to the soup and help keep you fuller, longer (also makes it more Zone-friendly)

Instructions
1) Add all ingredients to your slow cooker.
2) Mix together, and cook on low for 8-10 hours, until everything is very tender.
3) Using a blender or an immersion blender, puree your cooked mixture until everything is smooth.
4) Put it in a bowl, top with some cooked meat if you'd like, and warm yourself up!

Friday, January 10, 2014

Super Vegetable Curry (Chicken Optional!)

This recipe is an inspiration from my sister Krystal, who just got married! When I went to visit her the week before the wedding to help with some last minute details, she made me a delicious slow-cooker curry with lots of vegetables in it. It initially didn't have any protein in it, but she graciously threw in two chicken breasts for me at the last minute. I hadn't really tried to add extra veggies at all to my curry before, but I should have! Her recipe had some chickpeas in it, which I omit, but had carrots, onions and peas going on. It was delicious!

So I came back home and decided I wanted to make a chicken curry that was extremely heavy on the vegetables. You can literally add whatever you have around the kitchen and have a 5-veggie dish, or just add one or two and keep it simple. If you don't want to add the chicken, it's delicious without. But I added some to help add some protein and keep the macronutrient ratios pretty Zone-friendly.

Ingredients
1) 1 can of coconut milk (14 oz)
2) 2-3 tablespoons of curry powder (start with adding two, and then add more at the end if needed)
3) 1-2 cups of any or all of the following:
-diced carrots
-diced onions
-diced peppers (green, red, or yellow)
-diced sweet potato
-diced celery
-cauliflower florets
-broccoli florets
-chopped asparagus
-peas (add these in at the end though)

Optional: 1 pound of chicken thighs or breasts

(NOTE: I added in carrots, onions, green peppers, cauliflower, sweet potato and peas to mine, plus 1 pound of chicken thighs)

Instructions
1) Chop up your veggies and add them to your slow cooker. Mine pretty much took up the entire thing, but it cooks down about 10-20%.
2) Mix your can of coconut milk with 2TBSP of curry in a small bowl. If you like it spicier, taste it after it's cooked and add more curry then.
3) Add the curry milk to your crockpot and stir. Add in your meat if you want some now too.
Just the veggies
Veggies plus chicken
4) Cook on low for 8 hours. If you want to add peas, add them in at the last 30 minutes to maintain their shape.

YUM!


Tuesday, January 7, 2014

Sauteed Beef & Cabbage

I swear that my Polish boyfriend has extra strong smell associated with anything that has cabbage in it. I made this dish last night and when he come home from work he said "smells like cabbage in here", without me even telling him what I cooked! Cabbage is delicious, for sure, and such an inexpensive vegetable!

We are moving in a month to a new apartment, closer to my campus, and so I am trying to use up a lot of the freezer and pantry food that we have, so we have to move less. Then I can reorder once we are moved, instead of having to haul it all with us. I didn't realize that I had been using more pork than beef lately, so I wanted to cook something beefy up. I think I had tried something similar to this months ago for dinner one night, but with pork.

Normally whenever I use cabbage, I just buy a head of it and then chop it up. But just like cauliflower, it makes a big mess in my kitchen. I had found some prepacked coleslaw packs (minus the dressing), that were cheap and included the cabbage and some carrots. Win for us! Not only am I starting another batch of homemade sauerkraut using them (recipe to come soon), but I also snagged two extra packs to make this tasty meal. I also added in a pack of broccoli slaw, which I had never used before. So this recipe was no mess, and super easy! Don't want to buy the packs of pre-shredded cabbage? Chop up your own!

Ingredients
1) 2 pounds of ground beef (or ground pork/chicken/turkey)
2) 2 onions, diced
3) 2 packages of shredded cabbage (coleslaw mix), or about 1 head of cabbage shredded
4) Optional: 1 package of broccoli slaw
+ Salt/Pepper to taste

Instructions
1) Heat up the largest pan you have over medium-high heat, and add in your ground beef.
                                                    
2) While the beef is cooking, chop up your onions.

3) Add the onions to the beef once it has cooked about half way and has released some grease into the pan.
4) Saute up the beef and onions for about 5 minutes until the onions are tender and the beef is all the way cooked.
5) Add in your cabbage and/or broccoli and mix to incorporate. You're using the grease from your already cooked ground beef to assist the cooking. If your beef gave off too much for your liking, you can drain some, but still leave some in the pan to help cook the veggies. If you used turkey or chicken, add in 1-2 tablespoons of coconut oil or cooking oil of your choice.
6) Put a lid on the pot and cook for 15-20 minutes, stirring about every 5 minutes. Once the cabbage is thoroughly cooked and wilted, you're done! Season with salt and pepper if desired (I did!).

Thursday, January 2, 2014

Make Your Own Kombucha!

Happy New Year!

Have you ever had Kombucha before? It's fermented sweet tea, and it's full of healthy probiotics! Plus, it's delicious. You can buy it at Health Food stores, but it will run you about $3 for a pint...

Make your own!! I've been brewing my own for almost 8 months and have saved a TON of money! It ends up costing about $2 for a gallon when you make it yourself, which is super cheap for something so healthy and delicious.

First things first, you absolutely cannot make Kombucha without a SCOBY (symbiotic colony of bacteria and yeast). You can either get one from someone you know that already makes Kombucha (and make sure you get a few cups of already brewed unflavored kombucha from them as well), or you can do like I did and order one online. I highly HIGHLY recommend Kombucha Kamp, and they even sell through Amazon. The SCOBY takes about 5-7 days to arrive, and then you are ready to brew! Buy online here (about $25)

Ingredients
1) 1 SCOBY with 2-4 cups of unflavored kombucha (called "the mother" when you buy online)
2) Tea (loose tea, or bags; green or black or mixed. I used loose tea from Kombucha Kamp as well, and it's a mixture of green and black.) You will need 2 tablespoons of loose tea for every gallon you brew, or 8 tea bags per gallon
3) 1 cup of sugar per gallon (I use organic, evaporated cane sugar that I got at Costco. You can use plain on table sugar. Don't worry, the SCOBY will eat up the sugar so this is not a sweet drink and falls within the Paleo guidelines still. But don't use honey, maple syrup or xylitol or anything else. Just regular sugar!)
4) 1 gallon glass jar, plus one old t-shirt and a rubber band
5) Flavorings for your Kombucha (examples: any kind of juice, any pureed fruit. I make some with lemon juice, or pureed strawberries, or pureed blueberries, or juiced ginger, or store-bought mango juice, etc)

Instructions
Phase 1: Brewing your Kombucha

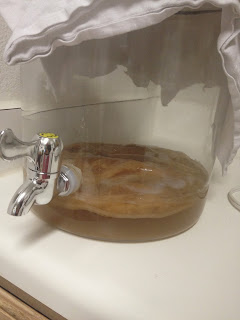
1) First, add your SCOBY and "the mother" liquid (2-4 cups of unflavored Kombucha) to your glass jar. 

                                        
2) Heat up a large pan with water, until boiling. You want about 6-8 cups of water in here, preferably filtered.
3) Prepare your tea bags. You will add 8 tea bags per gallon, or 2 tablespoons of loose tea in a tea bag cloth per gallon.
4) Once the water is boiling, turn off the burner but leave the water where it is. Add your tea bags and brew for 10 minutes..
5) Remove your tea bags, and add in 1 cup of sugar (for every gallon you are brewing). Stir.
6) Let the tea sit for 20-30 minutes until it comes to room temperature. Then add it to your gallon jar with your SCOBY.
7) Fill up the jar with water until you've reached the top (so that the volume now totals one galloon).
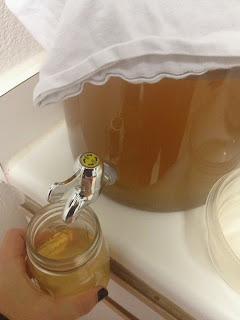
8) Top with an old shirt and a rubber band, to keep out fruit flies and dust. THIS IS VERY IMPORTANT! If you don't, fruit flies will lay eggs in your SCOBY and it will be ruined. Trust me, I tried to use cheese cloth and this happened, then I switched to an old t-shirt and it works perfectly!
9) Place on your counter and allow to ferment. You can put it in the pantry if you prefer but it will take a little longer to ferment and finish.
10) Begin checking your Kombucha after one week of fermentation. You want it to not taste sweet anyone and to have a pH between 2.0 and 3.0. You can use pH strips if you have some, so that you know what it's supposed to taste like. Eventually you'll become a pro and you won't need them anymore: you'll just know how it should taste. The longer it ferments, the more sugar will be eaten by the SCOBY and the more bitter it will become. The 2.0 to 3.0 pH is your sweet spot. In the summer in Texas it takes about 7 days for my Kombucha to be ready, and about 2-3 weeks in the winter. Check everyday until it's ready, by sampling a spoonful after you've stirred the gallon.

Phase 2: Flavoring and Bottling

Congratulations, your Kombucha is ready! Now to flavor it and add in some carbonation.

1) Fill up whatever bottles/jars you're going to use. I use mason jars. Fill about 2/3 of the way full with just unflavored Kombucha.
2) Add in your flavorings:
I recommend 1/8 to 1/4 cup of flavoring per 32oz of Kombucha. Add in 1/8 of a cup of your juice or puree, and taste the batch. If it's to your liking, fill up the rest of the jar with Kombucha. Put a lid on, and leave your jars out on the counter for two days.
3) Make sure you leave at least 4 cups of unflavored Kombucha in your gallon jar with the SCOBY. You'll use this to start your next batch.
4) Leave the jars out on your counter for 2 days, to allow the flavors to absorb and some carbonation to occur.
5) Now you're going to want to strain your Kombucha. I use cheese cloth, and place the bowl in the sink in case I spill.
6) Strain your mixture, and then add back to your jar.
7) For best keeping, put a small piece of waxed paper or parchment paper on top of the jar before you put the lid on to help keep the Kombucha from eating up your jar over time.
8) Now put your jarred Kombucha in the fridge and enjoy! I drink 8-16 ounces a day, and have tried a bunch of flavors! I routinely make ginger, watermelon, and peach. Sometimes we also make lemon, peach-mint, and mango. Buy whatever is in season and puree and freeze it, or buy juice, or frozen fruit. Just thaw and puree before you add it.